Agile Isn’t Just for Software — It’s for Life

When we hear Agile, most of us think of software development, Scrum boards, and sprint planning meetings. But Agile is more than just a work methodology — it’s a mindset. The same principles that help teams deliver software effectively can also guide us in building better, more balanced lives.

Here’s how the Agile mindset applies outside the workplace:


1. Sprints: Break Big Goals into Small Steps

In software, work is divided into short, manageable sprints. The same approach works beautifully in life.

  • Instead of setting overwhelming yearly goals, focus on 1–2 week mini-goals.
  • Want to get healthier? Start with a 2-week sprint of daily walks instead of planning a perfect diet and workout plan all at once.
  • Want to learn a new skill? Break it into “sprints” like Week 1: Setup tools, Week 2: Basics, Week 3: Projects.

Small, consistent wins add up to big progress.


2. Retrospectives: Reflect, Don’t Judge

After every sprint, Agile teams hold a retrospective to discuss what worked, what didn’t, and what can be improved.

In life, this means pausing regularly to check in with yourself:

  • What did I do well this week?
  • What drained my energy?
  • What can I try differently next week?

This turns failures into feedback and keeps you moving forward without guilt.


3. Adaptability: Embrace Change Gracefully

Agile thrives in uncertain environments where requirements change. Life is no different — plans rarely go exactly as expected.

  • Job changes, family needs, or unexpected challenges don’t have to derail us.
  • Instead of resisting, adjust your sprint goals and keep moving.
  • The key is focusing on what’s within your control and iterating as life unfolds.

Adaptability makes you resilient and future-ready.


4. Continuous Improvement: Growth Over Perfection

Agile emphasizes delivering value early and improving continuously. Perfection is not the goal — progress is.

In personal life, this means:

  • Don’t wait for the “perfect” time to start.
  • Begin small, learn as you go, and refine along the way.

Life is not about one big release — it’s about constant updates and improvements.


Visual diagram of an “Agile for Life – Personal Sprint Board”

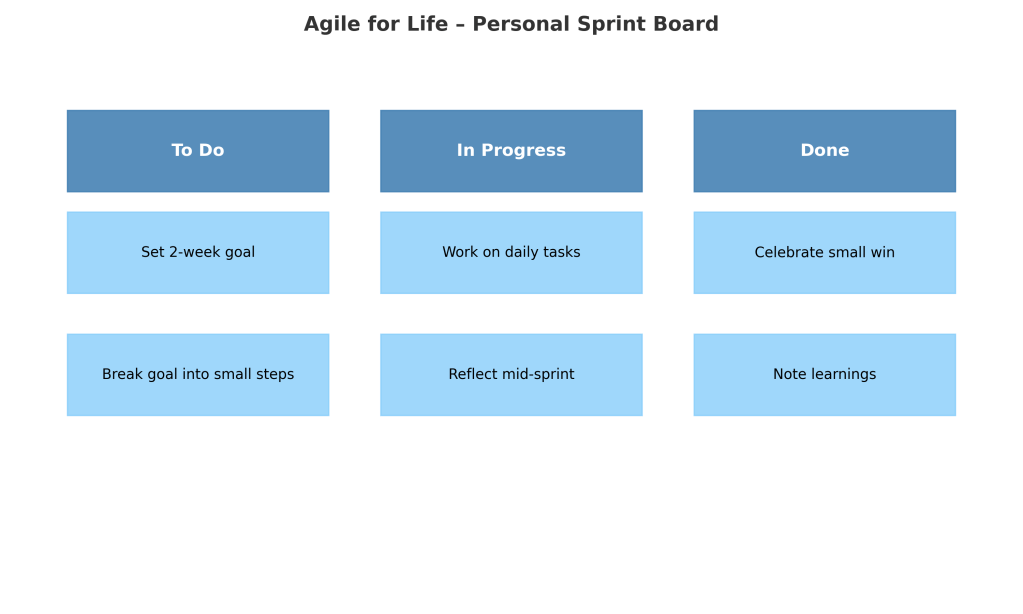
It shows how personal goals can be tracked just like Agile tasks:

  • To Do: Set a 2-week goal, break it into steps
  • In Progress: Daily tasks, mid-sprint reflection
  • Done: Celebrate small wins, note learnings

Key Takeaway

Agile teaches us that progress is more valuable than perfection, learning matters more than failing, and flexibility is stronger than rigidity.

So next time you’re setting goals or facing challenges, try asking yourself:
“How would I handle this if I were running life like an Agile sprint?”

Remember: Live Agile, not just work Agile.

Top Mistakes to Avoid in Embedded Linux Development

Embedded Linux offers a powerful and flexible platform for building custom devices — from routers and industrial controllers to smart home appliances. But working in this space comes with unique challenges that aren’t always obvious to newcomers.

If you’re getting started with Embedded Linux development, here are some common (but avoidable) mistakes that could cost you time, performance, or even product stability.

1. Ignoring Kernel Configuration

Many developers use default kernel configurations without customizing it for their hardware.

Mistake:
  • Leaving unnecessary drivers or debug options enabled.
  • Missing critical hardware support for your board (e.g., SPI, I2C, GPIO).
Fix:
  • Use make menuconfig (or xconfig) to tailor the kernel.
  • Disable what you don’t need — it reduces size and boot time.

2. Bloated Root Filesystem

It’s tempting to include everything in the root filesystem during development.

Mistake:
  • Shipping the same bloated image to production.
  • Keeping tools like gcc, gdb, or even nano in the final image.
Fix:
  • Use tools like Buildroot or Yocto to create minimal production images.
  • Separate your debug image and production image builds.

3. Not Using a Proper Bootloader Setup

The bootloader (usually U-Boot) is critical in embedded systems.

Mistake:
  • Ignoring U-Boot configuration.
  • Not backing up working bootloader settings.
Fix:
  • Learn the basics of U-Boot commands and environment variables.
  • Save a backup of known-good U-Boot config (printenv, saveenv).

4. Skipping Logging and Monitoring

Without logs, debugging in Embedded Linux is like flying blind.

Mistake:
  • Not enabling kernel logging (dmesg).
  • Not using syslog or logread.
Fix:
  • Configure lightweight loggers like BusyBox syslog or logrotate.
  • For advanced use: forward logs over UART or remote via netconsole.

5. Overlooking Security Best Practices

Security is often an afterthought — but embedded devices are always connected these days.

Mistake:
  • Using default root passwords.
  • Leaving services like SSH open to all interfaces.
Fix:
  • Disable unused services.
  • Use read-only filesystems and non-root users for applications.
  • Regularly update busybox/uClibc/libc and other core packages.

4. Lack of Version Control for Config and Build Scripts

You might be using Git for source code, but what about your build scripts, kernel configs, and environment setup?

Mistake:
  • Manually modifying files without version tracking.
Fix:
  • Keep your entire build system — including .config files and device trees — under Git.
  • Document custom patches and build steps clearly.

7. Not Testing on Actual Hardware Early

Simulation or QEMU is good for prototyping, but it hides real-world problems.

Mistake:
  • Developing purely on host or emulator.
  • Postponing hardware testing until late.
Fix:
  • Flash and test often on real hardware.
  • Watch out for hardware timing issues, I/O race conditions, or thermal problems.

Final Thoughts

Embedded Linux gives you immense control, but also demands discipline. Avoiding these common mistakes can help you build stable, secure, and maintainable systems.

Take time to set up your environment correctly, document as you go, and always test on real hardware.

If you’re working on your first project, bookmark this list — it might just save you days of debugging later!

5 Must-Know Linux Commands for Embedded Developers (with Examples)

If you’re starting out with Embedded Linux, mastering a few essential commands can make your development and debugging process much easier. Whether you’re working on a Raspberry Pi, BeagleBone, or a custom ARM board, these Linux commands help you peek under the hood and interact with the system confidently.

In this post, we’ll walk through 5 must-know Linux commands every embedded developer should know — with simple, practical examples.

1. dmesg – View Kernel Messages

The dmesg command shows messages from the kernel ring buffer. It’s extremely helpful for checking hardware initialization, driver logs, and boot issues.

USE CASE:

  • Check if a USB device or driver was detected.
  • Debug kernel boot sequence.

eXAMPLE:

$ dmesg | tail -20

Shows the last 20 kernel messages.

$ dmesg | grep tty

Lists serial ports (useful for debugging UART).

2. lsmod – List Loaded Kernel Modules

This command lists all currently loaded kernel modules (drivers). It’s useful for verifying if a driver for your hardware is active.

uSE CASE:

  • Check if your Wi-Fi or SPI driver is loaded.
  • Debug missing hardware functionality.

eXAMPLE:

$ lsmod

You might see something like:

spi_bcm2835    16384  0

Which means the SPI driver is loaded on a device.

3. top – Monitor CPU and Memory Usage

top gives you a live, real-time view of processes and resource usage. It’s perfect for tracking down performance issues in embedded systems.

Use case:

  • Identify CPU-heavy processes.
  • Check RAM usage on limited-resource systems.

example:

$ top

Press q to quit. Press Shift + M to sort by memory usage.

4. free – Show Memory Usage Summary

While top is interactive, free gives a quick snapshot of memory usage, which is useful for embedded systems with limited RAM.

Use case:

  • Monitor memory usage in scripts.
  • Check for memory leaks or insufficient RAM.

example:

$ free -h

The -h flag shows memory in a human-readable format like MB or GB.

5. strace – Trace System Calls

strace helps you see what a program is doing behind the scenes by tracing system calls. It’s invaluable when debugging file access errors or unexpected behavior in embedded applications.

Use case:

  • See if your application is trying to open a missing file.
  • Trace execution of a malfunctioning process.

example:

$ strace ./my_app

You’ll see logs like:

open("/etc/myconfig.conf", O_RDONLY) = -1 ENOENT (No such file or directory)

That’s a clue that the app is looking for a config file that doesn’t exist!

Nice is it ?!

As an embedded developer, your job doesn’t stop at writing C/C++ code. You also need to understand how your software behaves in a Linux environment. These commands are like your first-aid toolkit — helping you debug, optimize, and understand the system better.

If you’re new, start by running these commands on your development board. Observe how they behave, and make them part of your daily routine.

Happy hacking!

A Beginner’s Guide: Adding a User to sudoers in any Linux System

Navigating the Linux environment can be intimidating for beginners, especially when it comes to managing user privileges. In this guide, we’ll walk you through the process of adding a user to the sudoers file, granting them root privileges and enabling them to execute administrative commands. We’ll cover the necessary commands, provide explanations, and address potential difficulties that beginners might face.

Step 1: Access the Terminal

Open your terminal emulator. This is where you’ll be entering commands to interact with the Linux system.

Step 2: Check Current sudoers

Before making any changes, it’s essential to understand the current sudoers file. Use the following command to view its content:

cat /etc/sudoers

Step 3: Edit sudoers File

To add a user to the sudoers file, you should use the visudo command. This command opens the sudoers file in a safe manner, preventing simultaneous edits that could lead to corruption.

sudo visudo

Step 4: Navigate to User Privilege Specification

Within the sudoers file, you’ll find a section that looks something like this:

# User privilege specification

root ALL=(ALL:ALL) ALL

To add a new user (let’s call it “newuser”), insert the following line below the root entry:

newuser  ALL=(ALL:ALL) ALL

Step 5: Save and Exit

Save the changes by pressing Ctrl + X, then press Y to confirm, and finally, press Enter to exit.

Potential Difficulties and Resolutions:

1. Syntax Errors:

Mistakes in the sudoers file can lead to syntax errors. If you encounter issues, use the visudo command again and carefully review your changes. Ensure there are no typos or missing characters.

2. Permission Denied:

If you don’t have the necessary permissions to edit the sudoers file, use the sudo command before visudo, like this:

sudo visudo

3. Locked Out:

In the worst-case scenario, if you make a mistake and are unable to sudo, you can restart your system in recovery mode and revert the changes.

Conclusion:

Adding a user to the sudoers file empowers them with elevated privileges, but it’s crucial to approach this task with caution. Understanding the Linux environment, double-checking changes, and resolving potential issues are essential steps in managing user privileges effectively. With this guide, even beginners can navigate the process confidently.

Unveiling the Power of SSH in Linux: Secure Remote Access and Embedded Hardware Platforms

Secure Shell (SSH) is a fundamental and robust cryptographic network protocol widely used in the Linux environment. It plays a pivotal role in enabling secure communication over untrusted networks, making it an indispensable tool for remote administration, command execution, and file transfer. In this article, we’ll delve into the intricacies of SSH in Linux, exploring its core functionalities, and how it seamlessly integrates with embedded hardware platforms.

The Basics of SSH in Linux:

  1. Secure Connection Establishment: SSH begins by initiating a connection between a client and a server. During this process, the client and server negotiate encryption algorithms, key exchange methods, and authentication protocols to establish a secure channel for communication.
  2. Key Exchange Algorithm: The key exchange algorithm, often based on Diffie-Hellman, ensures the secure exchange of cryptographic keys without transmitting them directly. This helps prevent eavesdropping and ensures a secure foundation for the communication channel.
  3. User Authentication: Users can authenticate themselves using traditional username-password pairs or opt for a more secure method involving public and private key pairs. Key-based authentication adds an extra layer of security, especially beneficial in the context of embedded hardware platforms.
  4. Secure Channel Establishment: Once authentication is successful, SSH establishes a secure channel using the agreed-upon encryption algorithms. This secure channel ensures the confidentiality and integrity of data exchanged between the client and server.

SSH in Embedded Hardware Platforms:

The adoption of embedded hardware platforms introduces new challenges and opportunities for SSH integration. As these platforms often have resource constraints, optimizing SSH for efficiency becomes crucial. Here’s how SSH can be tailored for embedded systems:

  1. Minimalist Configurations: Configure SSH to use minimal resources on embedded devices. This may involve disabling unnecessary features and selecting lightweight cryptographic algorithms suitable for the platform’s capabilities.
  2. Key Management on Embedded Systems: Managing cryptographic keys on embedded devices requires careful consideration. Implement secure key storage mechanisms, and leverage the hardware capabilities of embedded systems for enhanced security.
  3. Integration with IoT Devices: SSH is integral in securing communication with Internet of Things (IoT) devices. Implementing SSH on embedded systems ensures that remote access to these devices is both secure and efficient.

Testing SSH on Linux:

Testing the effectiveness of your SSH implementation is crucial to ensure a robust security posture. Here are some recommended tests:

  1. Network Connectivity: Verify that SSH is listening on the appropriate port (default is 22) and that network connectivity is established between the client and server.
  2. Authentication Mechanisms: Test different authentication methods, including password-based and key-based authentication. Ensure that only authorized users can access the system.
  3. Key Rotation and Management: Regularly rotate cryptographic keys and ensure that key management practices are effective in maintaining a secure environment.
  4. Security Auditing: Conduct security audits periodically to identify vulnerabilities and address potential threats. Tools like OpenVAS and Lynis can assist in this process.

SSH in Linux stands as a cornerstone for secure remote access and communication. Its adaptability to various environments, including embedded hardware platforms, underscores its versatility. By understanding the core principles of SSH and testing its implementation rigorously, you can fortify your Linux systems against unauthorized access and ensure the integrity of your data, whether on traditional servers or embedded devices.